串接saml格式的single sign on
· 閱讀時間約 5 分鐘

What is SAML
SAML是 Security Assertion Markup Language(安全斷言標記語言)的縮寫,它是一個用於在網絡上進行身份驗證和授權的 XML 標準。
SAML是一種用於單點登錄(Single Sign-On, SSO)和身份提供者(Identity Provider, IdP)之間通信的協議。
它的主要目的是允許不同的網絡安全域之間共享身份信息,以實現用戶在多個應用程序和服務之間無需重複登錄的功能。
SAML主要有一些關鍵概念和角色:
身份提供者(IdP): 身份提供者是負責驗證和管理用戶身份的服務。當用戶嘗試訪問一個需要驗證的應用程序時,他們首先被重定向到 IdP,以驗證其身份。
服務提供者(SP): 服務提供者是需要驗證用戶身份的應用程序或服務。SP 不直接處理身份驗證,而是依賴於 IdP 驗證用戶並提供對應用程序的訪問權限。
SAML斷言: SAML 斷言是包含用戶身份信息的 XML 文件,由 IdP 簽名,然後發送給 SP。斷言通常包括用戶身份信息、有效期限、用戶角色等信息。
SSO(單點登錄):SSO 是指用戶只需一次登錄,然後就能夠訪問多個 SP,而不需要在每個 SP 上都進行單獨的登錄。SAML 是實現 SSO 的一種常見方法。
SAML 流程是什麼呢?
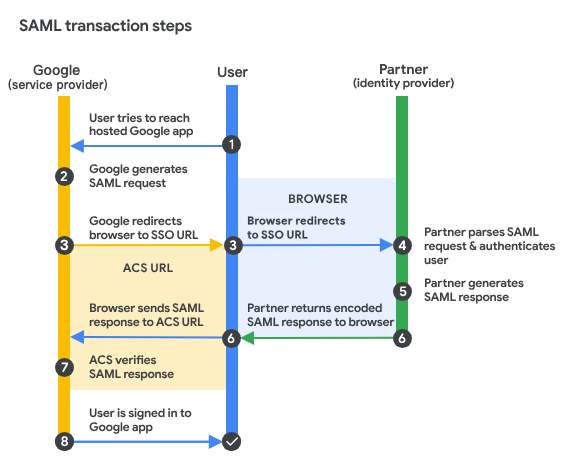
從這張流程圖中來解釋
- user嘗試訪問一個需要身份驗證的 SP。
- SP 接收到user的訪問請求後, 會將user重定向到 IdP,進行相關的身份驗證。
- user在 IdP 上驗證身份。
- IdP 創建一個包含user information的 SAML 斷言,並將其簽名。
- IdP 將 SAML 斷言發送回 SP。
- SP 驗證 SAML 斷言的簽名,然後根據斷言中的information決定是否允許user訪問應用程序。
SAML 是企業和組織中實現單點登錄和安全身份管理的重要工具,特別是當存在多個應用程序和服務時,並希望用戶無需多次輸入他們的登錄資訊。
它提供了一個標準化的方法,以確保安全地共享身份信息。
實作
筆者這邊以ROR專案為例, 並以可支援多個IdP進行實作
# routes.rb

# 這邊搭配devise提供的user scope
devise_scope :user do
  post '/users/sso/sign_in' => 'users/sso_sessions#new'
  post 'users/sso/auth/:idp_id' => 'users/sso_sessions#auth', as: 'users_sso_auth'
end
# models/account.rb
# frozen_string_literal: true

class Account < ApplicationRecord
  class << self
    def get_saml_settings(idp_provider)
      OneLogin::RubySaml::Logging.logger = Logger.new(Rails.root.join('log/ruby-saml.log'))
      settings = OneLogin::RubySaml::Settings.new

      # When disabled, saml validation errors will raise an exception.
      settings.soft = true

      # 設置你server提供的callback url
      settings.assertion_consumer_service_url = "http://localhost:3000/users/sso/auth/#{idp_provider.id}"
      # 設置你server提供的sp url
      settings.sp_entity_id                   = 'http://localhost:3000/sp'
      # idp 實體ID
      settings.idp_entity_id                  =
      # idp sso登入網址
      settings.idp_sso_service_url            =
      # idp 憑證
      settings.idp_cert                       =
      settings.name_identifier_format         = 'urn:oasis:names:tc:SAML:1.1:nameid-format:emailAddress'
      settings.idp_sso_service_binding        = 'urn:oasis:names:tc:SAML:2.0:bindings:HTTP-POST'
      settings.idp_sso_service_binding        = 'urn:oasis:names:tc:SAML:2.0:bindings:HTTP-Redirect'
      settings.idp_cert_fingerprint           = OpenSSL::Digest::SHA1.new(Base64.decode64(idp_provider.certificate)).to_s
      settings
    rescue
      nil
    end
  end
end
# sso_session_controller.rb

def new
  # 你可以先透過某些key(ex: user_email etc...) 抓到idp, 再去拿設定檔
  idp_provider = IdentityProvider.find()
  settings = Account.saml_settings(idp_provider)
  request = OneLogin::RubySaml::Authrequest.new
  sso_login_url = request.create(settings)
  # 跳轉至IdP登入網址, 動態取得setting就可支援多IdP
  redirect_to(sso_login_url)
rescue
  head(:bad_request)
end

# saml callback
def auth
  # 我這邊還蠻建議帶個idp_id(這裡可以用uuid之類的), 在IdP驗證完的時候, 可以直接透過這個id直接拿到對應的provider
  idp_provider = IdentityProvider.find_by(idp_id: params[:idp_id])
  settings = Account.saml_settings(idp_provider)
  response = OneLogin::RubySaml::Response.new(params[:SAMLResponse], settings: settings)
  # response.is_valid? 沒有通過驗證可以考慮直接回傳401
  unless response.is_valid?
  # 如果response過驗證後, 就可以走devise的流程即可
  user = User.find_by(email: response.name_id)
  sign_in(:user, user)
  yield user if block_given?
  redirect_to(after_sign_in_path_for(user))
end
結語
其實使用saml來實作SSO(Single sign on)的流程並不複雜, 基於上述實作方式可根據不同情境做不同的實作細節。